Quick navigate this page
Snap Pod - Quick Start Guide
Hey Professionals 👋
Welcome to your friendly guide on using Snap Pod in DaVinci Resolve. Whether you’re a beginner or a seasoned pro, we’ll walk you through everything you need to know to get started, including:
- Understanding Snap Pod’s buttons and controls
- Setting up an Auto Edit-ready timeline
- Tailoring Snap Pod to match your editing style
- Time-saving workflow tips
Setting up a timeline that’s Auto Edit Ready
To get the most out of Snap Pod’s auto-editing magic, your timeline needs to meet a couple of simple conditions:
- At least two audio tracks (one per speaker).
- Balanced audio levels (consistent loudness across tracks).

How To Setup Timeline
Step 1: Add Your Close-Up Shots
- Drop your close-up camera footage and videos onto the timeline.
- Ensure they’re synced and aligned properly with the audio.
- Each close up of speaker NEEDS an accompanying audio track, i.e.:
- 2 speakers = 2 audio tracks
- 3 speakers = 3 audio tracks
- And so on!

Step 2: Add Your Wide Angle

- Add your wide angle to the timeline
- Make sure it’s synced and aligned with your close ups.
👆 Tip: You don’t need an audio track for the wide angle.
Step 3: Level Your Audio
Snap Pod relies on audio loudness to make smart editing choices, so balanced levels are key. You can use DaVinci Resolve’s built-in tools or third-party audio software—whatever works for you!
Goal: When someone’s speaking, aim for the audio to hit -20 dB or higher (the yellow zone on the track meter).

What if the audio is too quiet?
You can simply increase the volume in the edit page like this 🙂
- Speaking: Aim for 20 dB or above.
- Silence/background: Keep it 30 dB or below.

Tip: Watch Out for Noise
Background sounds—like mic bleed, echoes, or chatter—can trip up Snap Pod. Keep non-speaking noise below -30 dB for clean results.
Double-Check Your Timeline
If your new to Snap Pod, we recommend copying this handy checklist somewhere to make sure you’re ready to go on every future edit.
Essential Checklist

👆 Once you’ve done the above, you now have a timeline that’s ready to AUTO EDIT
Time for our first AUTO EDIT.
Now is a great time to see if Snap Pod does what you expect by giving the auto edit a quick test.
Here’s how:
First, Create a mini test timeline
Got a 3-hour podcast? Depending on your computer’s speed, auto-editing could take 2 to 20 minutes. Save time by testing a short chunk first. Here’s how:

Step 1: Duplicate Your Timeline

- Right click on your timeline in media pool
- Select “Duplicate Timeline” and rename it (e.g., “Test Timeline”).
- Double click to open it.
Step 2: Cut a 5-Minute Test Section
In your new timeline
- In your duplicated timeline, find a 5–10-minute segment where all speakers talk.
- Pro Tip: Use audio waveforms to spot active dialogue.
- Move the playhead to the start of your section and press Cmd + B (or Ctrl + B) to cut all tracks.
- Move to the end, cut again with Cmd + B, then delete the rest.
- Delete the rest of the footage
- Slide your test section to the timeline’s start.

Step 03 - Give it a whirl
With the timeline and Snap Pod setup, we can now give it a test.
Open Snap Pod
- Open Snap Pod:
- Go to Workspace > Workflow Integrations > Snap Pod.

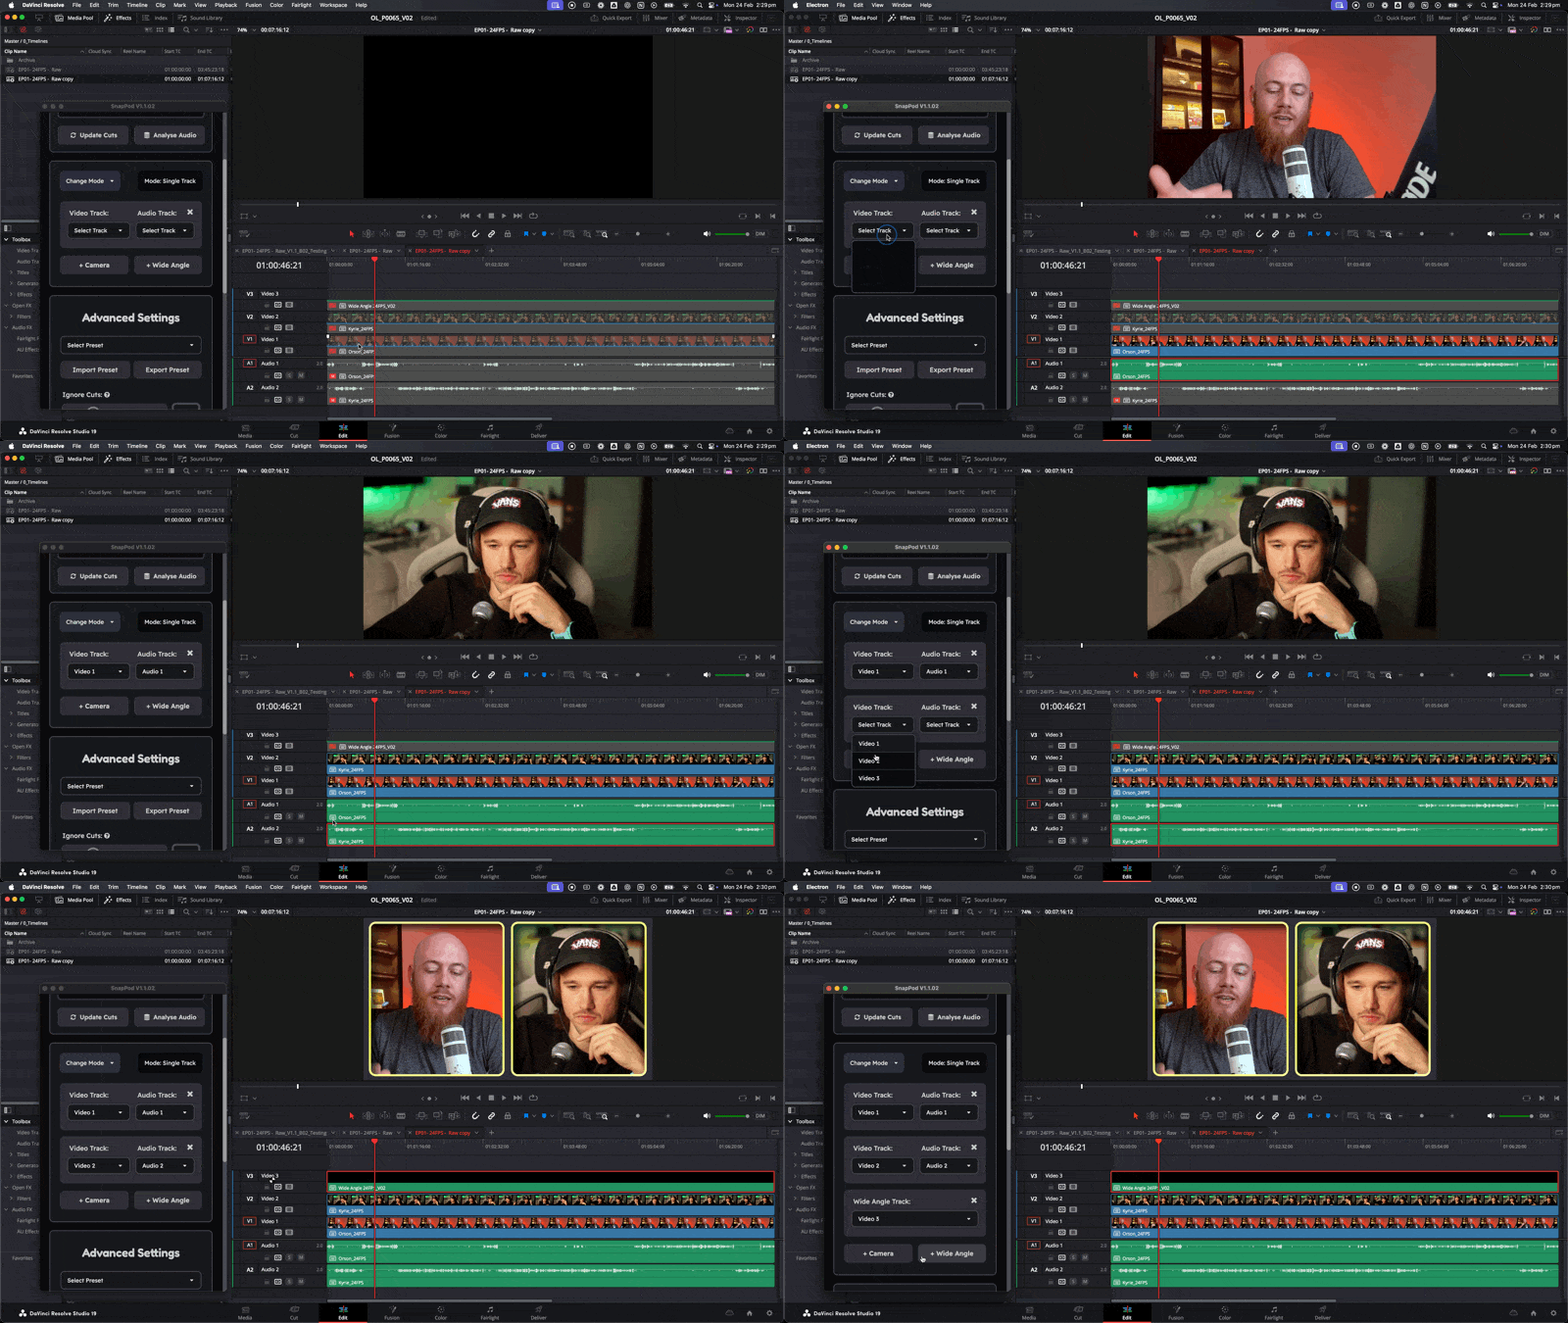
Align Audio and Video

- Assign tracks:
- Match each speaker’s audio and video tracks in Snap Pod’s settings.
- Got a wide angle? Add it and specify its track.
Click Auto Edit
- Hit Auto Edit and watch the magic happen!

Reviewing the results
If Snap Pod is smoothly switching between speakers as they talk—congrats, it’s working like a charm! You should see clean cuts timed to the dialogue.
What you should see

Find Your Style
Not quite happy with the edit? Now’s the perfect time to tweak Snap Pod’s settings to match your vision. We’ve got a quick guide to help you dial it in—check it out and make Snap Pod your own!